Easy Vegan Honey

I’ve not posted in my blog for a few months. We’ve had a difficult start to the year and it’s been difficult to find words for anything. Then along came corona virus and lockdown. Schools are shut and we’re all forced into home educating our children. I don’t know about your house but mine is chaos. Kids aren’t doing nearly as much work as I’d like them to but I’m not in the best place to chow at them to make them do it right now.

As a result we’re still learning but just not always the stuff on the curriculum. It’s fun and impulsive and right now it’s exactly what we need.

We had a garden full of dandelions which led to some discussion with Toby (4) about the flowers and bees. He asked if people could eat them and that’s how we came to try dandelion honey!

Dandelions are really nutritious and versatile. They contain lots of vitamins and minerals. It is thought that they can help reduce inflammation and aid blood sugar control. It is also suggested that it could reduce cholesterol and blood pressure. There are lots of studies that have shown many positives of dandelion consumption but I’m not here to tell you they will or won’t help fight one disease or another.

Back to the honey, it’s delicious. It has a slight floral flavour but it’s not overpowering. It tastes surprisingly like regular honey.

The littlies love picking the flowers, it’s even better because we know where they’ve grown and that we’ve never exposed them to any chemicals so they’re completely chemical free. Toby is currently in foundation so we use activities like these to practise counting and to discuss the importance of flowers, nectar, bees etc.

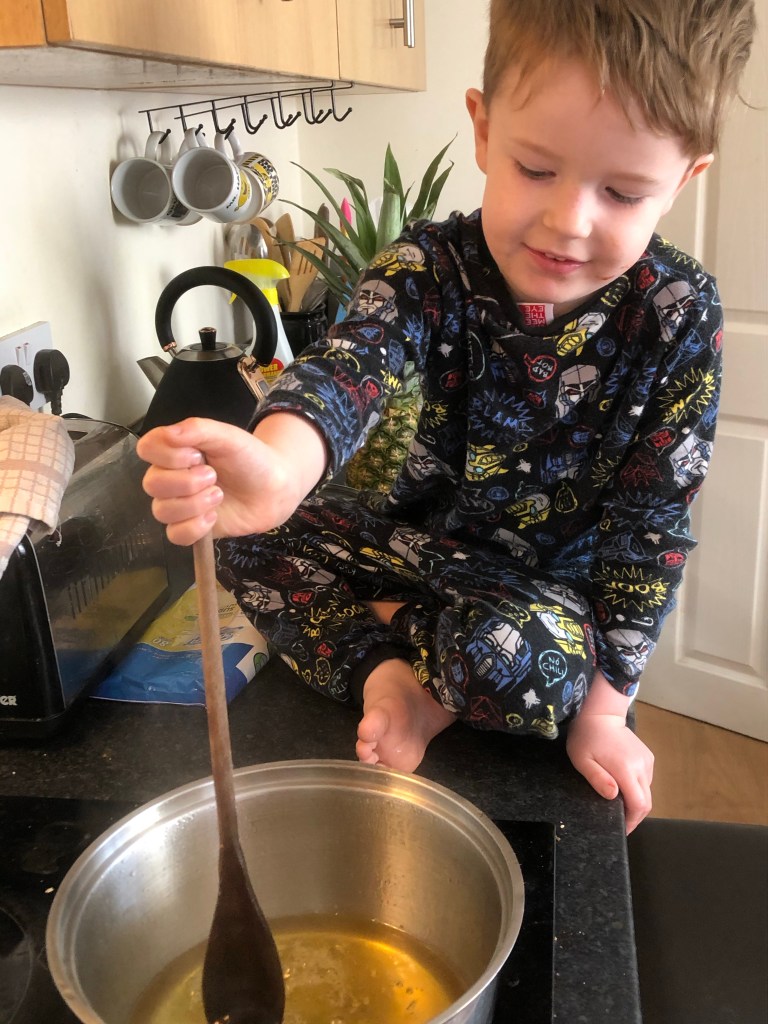
Toby had great fun stirring the mixture and weighing out the many different items in the kitchen that he could find.

After we had made it (it took around 14 hours as you start it in the evening and then leave it to infuse overnight. But there’s nothing overly tricky. Toby had some honey on bread for his lunch and enjoyed every bite.

I didn’t realise how dry his bread looked but that’s how he likes it 🤣

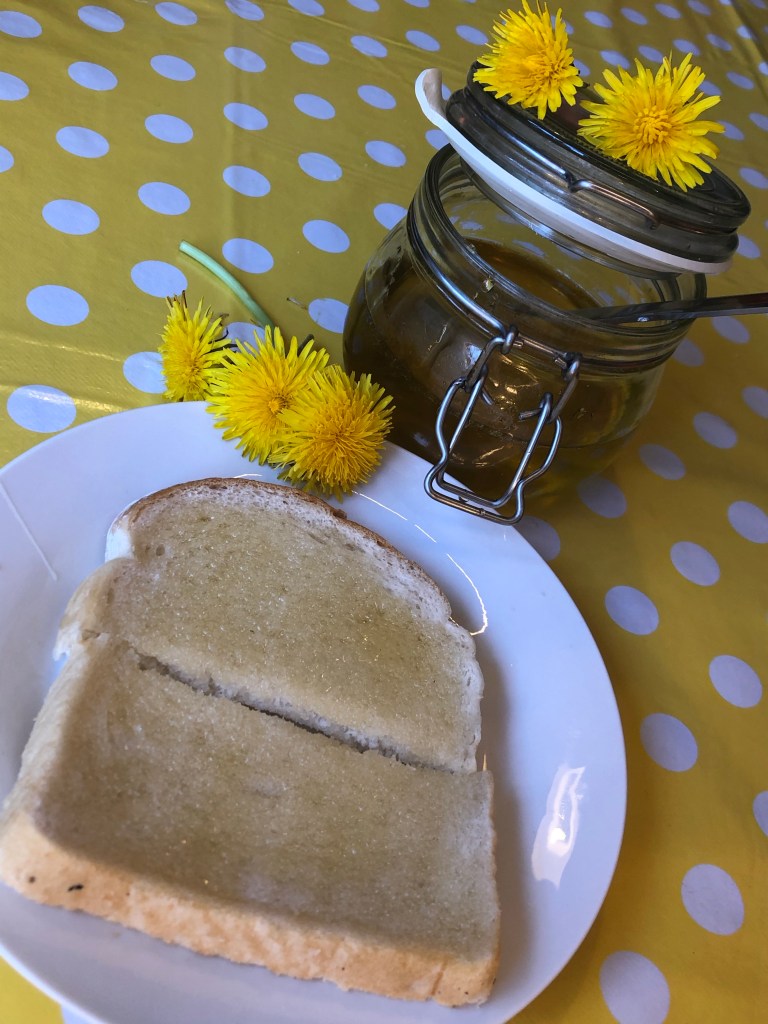
I’ve added a recipe card that can be saved if you are interested in trying this recipe too.

Quick Easter/Spring Corner Bookmarks

We’re self isolating at the moment and also home educating all 3 school age children due to the schools closing down. I work in school and I’m now not rota’d in until June which gives me 12 weeks at home to stay away as far away from the rest of the world as I can.

We’re trying to keep it inexpensive, I’m fully aware that so many people are being completely financially destroyed by this virus and it’s made me appreciate even more what we have at the moment.

I like these bookmarks because they’re quick and easy, and hopefully will encourage the kids to read so they can use them.

Here’s how we made them!
Start with squares of paper – your main piece should be around 15cm squared!
Fold the first piece of paper in half bringing two corner points together.
Fold the top corner down to meet the bottom point.
Repeat with the other side.
Open the folds back out.
Fold the top piece of the bottom points up along the creases.
This is what you should have now.
Bring one of your sides back down and tuck inside the fold you just made.
Like this. I
Repeat with the other side. It should look like this.
This is the completed basic corner bookmark. Now you need to turn it into your chosen character, theme, etc.
This one is going to be a chick. We cut and rounded the edges.
Next we drew on the eyes and cut out the basic shapes to stick on to our chick.
Voila! Our finished chick!
A bit of a clearer picture since we made a yellow chick and have a yellow tablecloth 🤣

There are so many different things you could possibly make with yours. We spent about half an hour on this craft and made these.

Toby (4y) started out making a sunflower one. This turned into a monster sunflower. He is very proud and so am I! Of course some help/supervision is required for cutting out but he enjoyed letting his imagination run free.
Kaesey made an Easter bunny which was really simple..
And a spring flower. (Might be better on the other side but will still work this way too).

Fun Easy To Make Sensory Bottles

Sensory bottles are so easy to make and can also be super handy for calming down upset children! There’s something super mesmerising about watching the interaction between all the ingredients

The bottles are also really adaptable. Experiment with the amounts, put in plastic toys, feathers, glitters, buttons and so much more!

Here is how we made ours!

You will need:

  • Plastic bottles (you could recycle your own old pop bottles or amazon sell empty bottles reasonably cheap, we got 250ml bottles but you could go bigger).
  • Water beads (easily available on amazon or eBay).
  • Water
  • Baby oil
  • Glitter
Method:

Soak your beads, instructions generally say overnight but you can get away with 3-4 hours!

Pick your colour scheme – I went for an ordered rainbow theme, Zak went for clear beads, Kaesey used purple and blues and Toby just grabbed handfuls if any colour. They all looked amazing!

We filled ours to the brim, we then found you’re better off not filling up completely to allow movement which should increase the calming affect!

Once you’ve added your beads fill up the space that remains with baby oil.

Add any glitter you want and close and seal the lid! Hey presto, easy peasy sensory bottles.

If you wanted to add more interesting items such as buttons leave out some of the beads, or all the beads! There are so many different versions of these that would be effective! Fun to make and use!

Just one warning! Don’t take the tubs of beads into a carpeted room! Just don’t! 😂

Video – Sensory Bottles

Quick and Easy Recipe: Sweet Potato & Chilli Soup

I absolutely love the taste and texture of sweet potatoes. They make a slightly lighter but far more flavourful alternative to the regular potato and for that reason I think they’re much more versatile.

The soup served with cheddar.

The sweet potato is high in fibre, nutritious and very filling, and they’re available year round.

This recipe is one of my favourite uses for sweet potato, it’s quick and easy and the result is a delicious and very filling soup.

It’s my go-to winter warmer in these cold Yorkshire winters, the chilli gives you a bit of a kick to help warm you from the inside. If you like spicy add a little more and if you’re not so keen then add less.

I serve mine with a sprinkling of grated cheese and a couple of slices of crusty bread with real butter.

Served with mozzarella cheese.

It doesn’t usually last long in my house but I have found it’s still okay to eat 3 days after it’s been made if stored in airtight container in the fridge (allow to cool first). You could also freeze in individual portions. To reheat pop it in the microwave for 1-2 minutes depending on your portion size, or warm over a low/medium heat on the hob.

Over to the recipe.

Quick Sweet Potato & Chilli Soup Recipe

1 onion

1 red chilli (or a pinch of dried)

1 tsb coriander

2 crushed garlic cloves (or a 2 tsp of garlic granules)

750g sweet potato, peeled and cubed (1-2 inch cubes are fine)

700ml of chicken stock (use vegetable stock for a vegetarian alternative)

Your favourite grated cheese (optional) – I used mozzarella in these pictures but I’ve also used cheddar and Gouda in the past, both of which were equally tasty.

Method

1. Over a medium heat, soften the onion, chilli, coriander and garlic in a little butter for 3-4 minutes.

2. Add the sweet potato followed by the stock and bring to the boil.

3. Cover and allow to simmer for around 20 minutes.

4. Blend, add a sprinkling of grated cheese, serve and enjoy.

Go make this right now, I promise you won’t be disappointed.

Let me know what you think.